1
2
3
4
5
6
7
8
9
10
11
12
13
14
15
16
17
18
19
20
21
22
23
24
25
26
27
28
29
30
31
32
33
34
35
36
37
38
39
40
41
42
43
44
45
46
47
48
49
50
51
52
53
54
55
56
57
58
59
60
61
62
63
64
65
66
67
68
69
70
71
72
73
74
75
76
77
78
79
80
81
82
83
84
85
86
87
88
89
90
91
92
93
94
95
96
97
98
99
100
101
102
103
104
105
106
107
108
109
110
111
112
113
114
115
116
117
118
119
120
121
122
123
124
125
126
127
128
129
130
131
132
133
134
135
136
137
138
139
140
141
142
143
144
145
146
147
148
149
150
151
152
153
154
155
156
157
158
159
160
161
162
163
164
165
166
167
168
169
170
171
172
173
174
175
176
177
178
179
180
181
182
183
184
185
186
187
188
189
190
191
192
193
194
195
196
197
198
199
200
201
202
203
204
205
206
207
208
209
210
211
212
213
214
215
216
217
218
219
220
221
222
223
224
225
226
227
228
229
230
231
232
233
234
235
236
237
238
239
240
241
242
243
244
245
|
<font style="color:rgb(153, 153, 153);background-color:rgb(250, 250, 250);">.</font><font style="color:rgb(166, 127, 89);background-color:rgb(250, 250, 250);">/</font><font style="background-color:rgb(250, 250, 250);">solr </font><font style="color:rgb(221, 74, 104);background-color:rgb(250, 250, 250);">start</font><font style="background-color:rgb(250, 250, 250);"></font>
<font style="color:rgb(153, 153, 153);background-color:rgb(250, 250, 250);">~~~</font>
<font style="color:rgb(153, 153, 153);background-color:rgb(250, 250, 250);"></font>
<font style="color:rgb(153, 153, 153);background-color:rgb(250, 250, 250);">几条常用命令</font>
```shell
solr start –p 端口号 #单机版启动solr服务
solr restart –p 端口号 #重启solr服务
solr stop –p 端口号 #关闭solr服务
```
<font style="color:rgb(153, 153, 153);background-color:rgb(250, 250, 250);"></font>
<font style="color:rgb(77, 77, 77);">这将在后台启动 Solr,侦听端口 8983。当您在后台启动 Solr 时,脚本将等待以确保 Solr 正确启动,然后再返回命令行提示符。
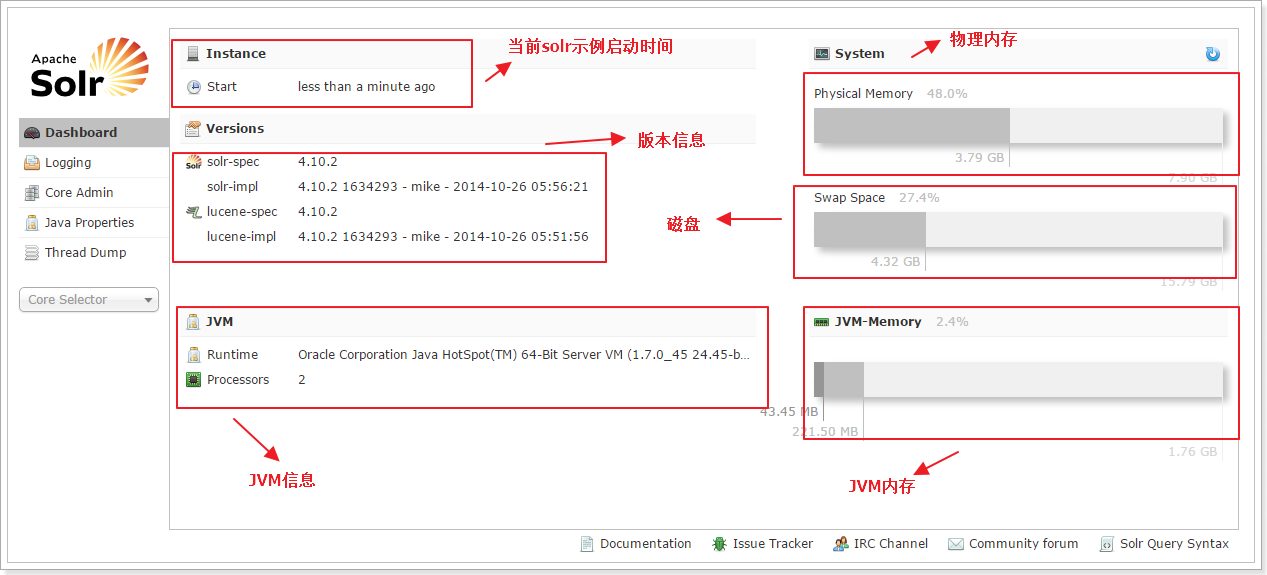
</font><font style="color:rgb(77, 77, 77);">启动完成后默认监听8983端口,</font>[管理界面](http://localhost:8983/solr/)<font style="color:rgb(77, 77, 77);">访问地址:http://localhost:8983/solr/</font>
## <font style="color:rgb(79, 79, 79);"> 停止Solr</font>
<font style="color:rgb(77, 77, 77);">在bin目录下执行命令:</font>
<font style="color:rgb(153, 153, 153);background-color:rgb(250, 250, 250);">.</font><font style="color:rgb(166, 127, 89);background-color:rgb(250, 250, 250);">/</font><font style="background-color:rgb(250, 250, 250);">solr stop </font><font style="color:rgb(166, 127, 89);background-color:rgb(250, 250, 250);">-</font><font style="background-color:rgb(250, 250, 250);">all</font>
<font style="color:rgb(77, 77, 77);">注:停止时必须指定端口。</font>
# <font style="color:rgb(51, 51, 51);">安装php扩展solr .dll</font>
## 0、环境
1. 操作系统:Windows10
2. solr: 8.9.0
3. php:7.3 (nts)
## 1、扩展说明
**扩展地址:**
[<font style="background-color:rgb(250, 250, 250);">https://pecl.php.net/ </font>](https://pecl.php.net/ )
**<font style="color:rgb(0, 0, 0);background-color:rgb(250, 250, 250);">确定线性与非线性</font>**
<font style="color:rgb(0, 0, 0);background-color:rgb(250, 250, 250);">Non Thread Safe </font><font style="color:rgb(153, 153, 153);">(</font><font style="color:rgb(0, 0, 0);background-color:rgb(250, 250, 250);">NTS</font><font style="color:rgb(153, 153, 153);">)</font><font style="color:rgb(0, 0, 0);background-color:rgb(250, 250, 250);"> x64 / Thread Safe </font><font style="color:rgb(153, 153, 153);">(</font><font style="color:rgb(0, 0, 0);background-color:rgb(250, 250, 250);">TS</font><font style="color:rgb(153, 153, 153);">)</font><font style="color:rgb(0, 0, 0);background-color:rgb(250, 250, 250);"> x64</font>
<font style="color:rgb(0, 0, 0);background-color:rgb(250, 250, 250);">通过phpinfo</font><font style="color:rgb(153, 153, 153);">();</font><font style="color:rgb(0, 0, 0);background-color:rgb(250, 250, 250);"> 查看其中的 Thread Safety 项,这个项目就是查看是否是线程安全</font>
<font style="color:rgb(0, 0, 0);background-color:rgb(250, 250, 250);">如果是:enabled,一般来说应该是ts版,否则是nts版。</font>
##
2、安装php扩展
打开扩展下载地址:
[https://pecl.php.net/package/solr](https://pecl.php.net/package/solr)
选择版本后面的dll文件(我用的是2.5.1版本的dll)
[https://windows.php.net/downloads/pecl/releases/solr/2.5.1/php_solr-2.5.1-7.3-nts-vc15-x64.zip](https://windows.php.net/downloads/pecl/releases/solr/2.5.1/php_solr-2.5.1-7.3-nts-vc15-x64.zip)
并点击下载。
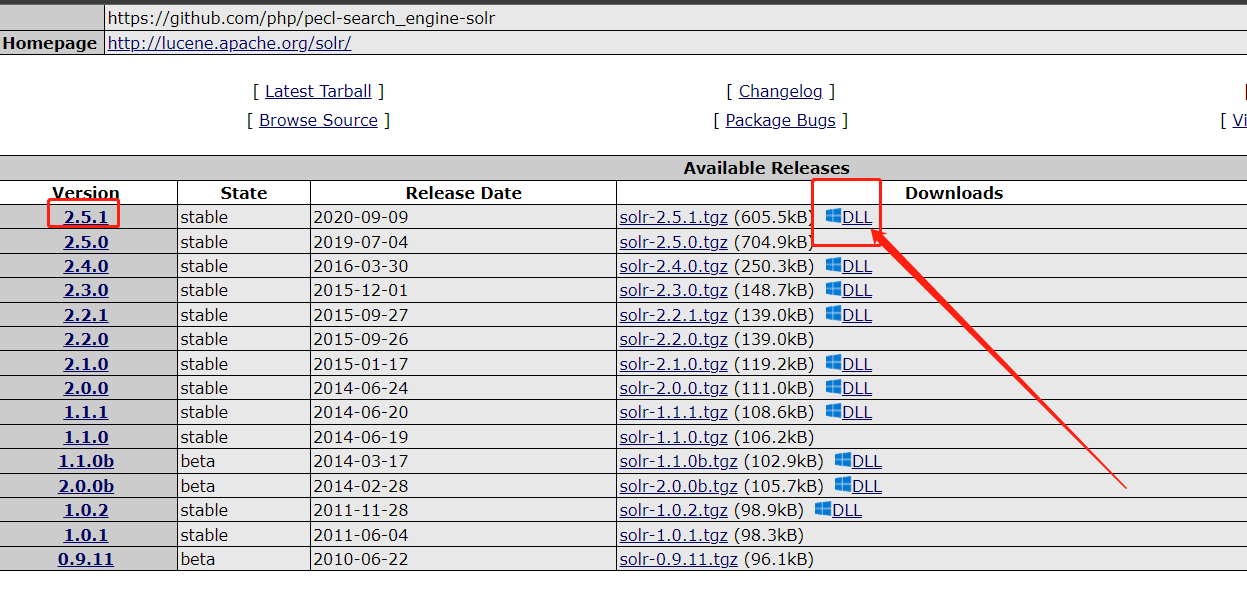
下载成功后,解压获取:
1. <font style="color:rgb(0, 0, 0);background-color:rgb(250, 250, 250);">php_solr.dll </font>
2. <font style="color:rgb(0, 0, 0);background-color:rgb(250, 250, 250);">php_solr.pdb</font>
<font style="color:rgb(0, 0, 0);background-color:rgb(250, 250, 250);">将压缩包的php_solr.dll、php_solr.pdb 放到你的 php 扩展目录下 php/ext/ 下。 </font>
<font style="color:rgb(0, 0, 0);background-color:rgb(250, 250, 250);">php.ini中加入 extension</font><font style="color:rgb(166, 127, 89);">=</font><font style="color:rgb(0, 0, 0);background-color:rgb(250, 250, 250);">php_solr.dll </font>
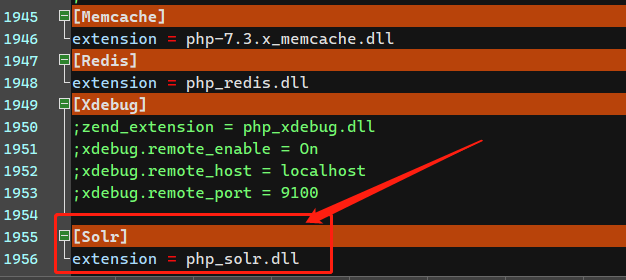
<font style="color:rgb(0, 0, 0);background-color:rgb(250, 250, 250);">我的集成环境位置: </font>D:\phpEnv\php\php-7.3\ext
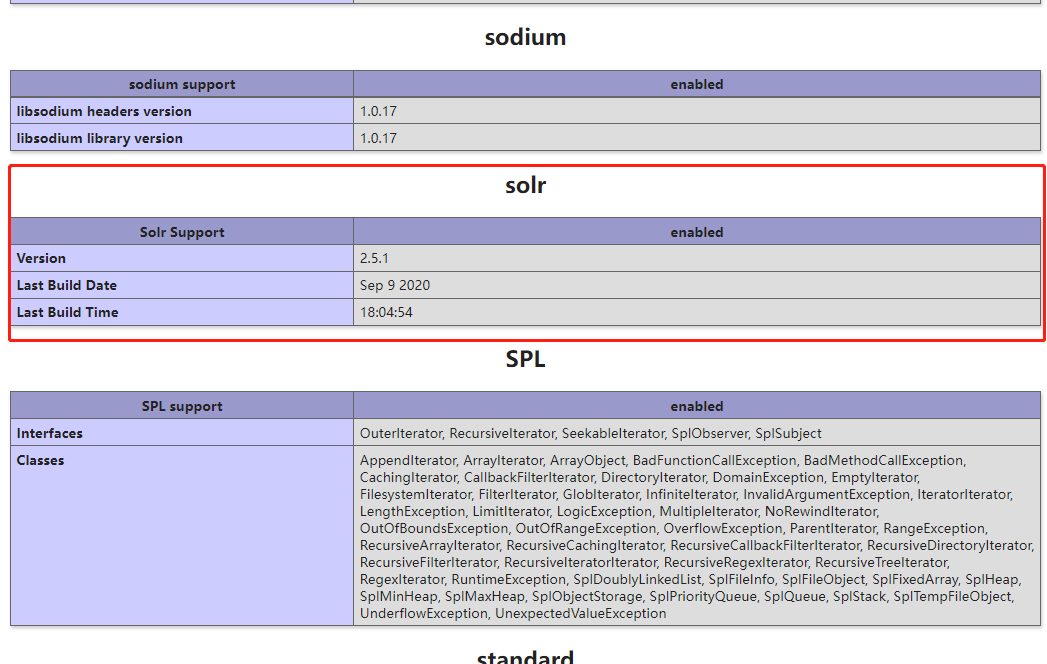
<font style="color:rgb(0, 0, 0);background-color:rgb(250, 250, 250);">重启服务器,查看phpinfo</font><font style="color:rgb(153, 153, 153);">()</font><font style="color:rgb(0, 0, 0);background-color:rgb(250, 250, 250);">,</font>
<font style="color:rgb(0, 0, 0);background-color:rgb(250, 250, 250);">是否有显示solr扩展加载成功。</font>
# <font style="color:rgb(79, 79, 79);"> 常用操作</font>
**<font style="color:rgb(77, 77, 77);">创建core,-c指定创建的core名</font>**
<font style="color:rgb(153, 153, 153);background-color:rgb(250, 250, 250);">.</font><font style="color:rgb(166, 127, 89);background-color:rgb(250, 250, 250);">/</font><font style="background-color:rgb(250, 250, 250);">solr create </font><font style="color:rgb(166, 127, 89);background-color:rgb(250, 250, 250);">-</font><font style="background-color:rgb(250, 250, 250);">c test_core1 </font><font style="color:rgb(153, 153, 153);background-color:rgb(250, 250, 250);">1</font>
**<font style="color:rgb(77, 77, 77);">删除core,-c指定删除的core名</font>**
<font style="color:rgb(153, 153, 153);">.</font><font style="color:rgb(166, 127, 89);">/</font>solr delete <font style="color:rgb(166, 127, 89);">-</font>c test_core1
## 二、创建核心
### 2.1 创建核心前准备工作
每个核心都是solr的一个实例,一个solr服务可以创建多个核心,每个核心都可以进行自己独立配置。
+ 1.切换至solr_home\server\solr目录,例如:E:\solr-8.1.1\server\solr,在该目录下创建一个文件夹,文件夹名称与核心名称相同。 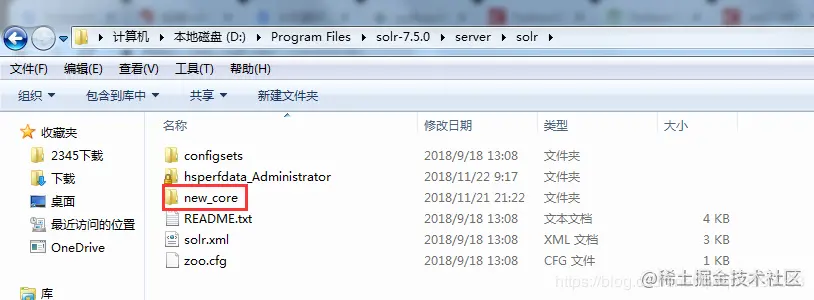_v_images/2019062
+ 2.将E:\solr-8.1.1\server\solr\configsets_default路径下的conf文件夹复制到new_core目录(E:\solr-8.1.1\server\solr\new_core)下。
### 2.2 创建核心
#### 方式一:打开solr界面,进行如图顺序操作。
这种方式 需要 在 E:\solr-8.1.1\server\solr 目录下创建 new_core文件夹
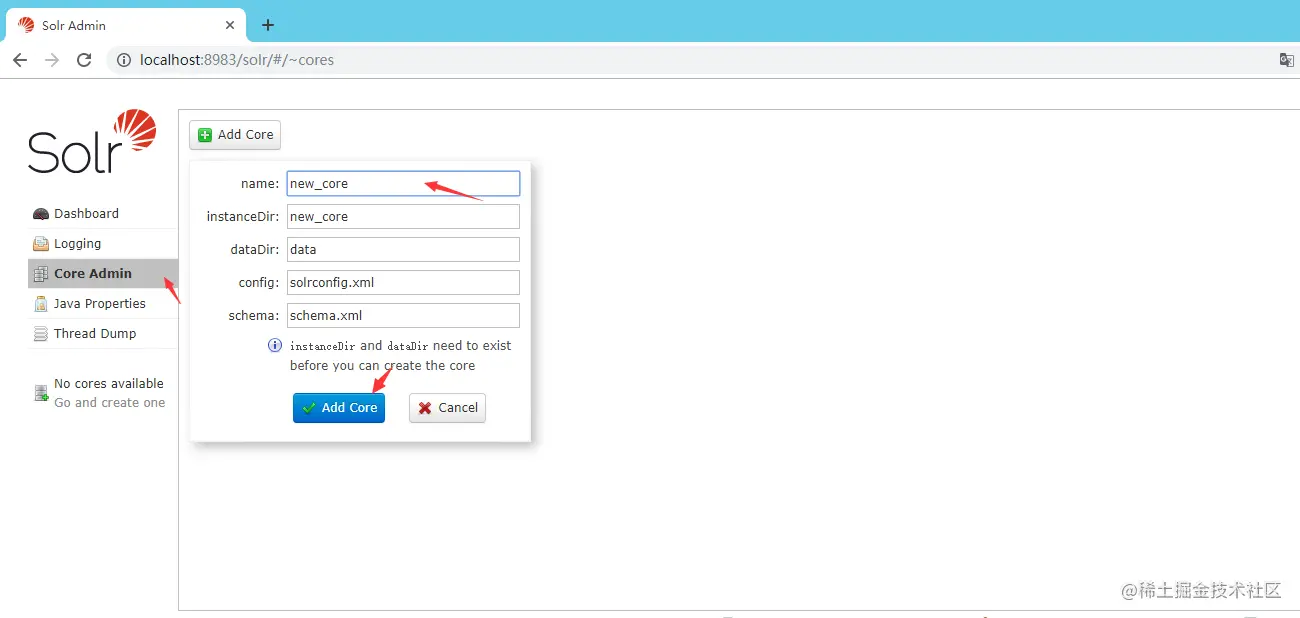
#### 方式二:bin目录下输入命令:solr create -c new_core (推荐)
## 三、schema
每个核心core中都有这么一个 schema配置文件。 schema文件可以对索引库的数据类型进行定义,对字段是否进行索引、存储等进行配置,需要针对狠心单独进行配置。 schema的数据类型进本够用,如果不能满足需求,比如说对中文分词、拼音分词等,就可以自定义分词器。 Solr8.1.1 的schema的配置文件名 为managed-schema,home\server\solr\new_core\conf\managed-schema(E:\solr-8.1.1\server\solr\core_issuer\conf)。
### 3.1 schema主要成员
+ (1) fieldType:为field定义类型,最主要作用是定义分词器,分词器决定着如何从文档中检索关键字。
+ (2) analyzer:fieldType的子元素,是分词器,由tokenizer和filter组成。例如
<fieldType name="text_tr" class="solr.TextField" positionIncrementGap="100"> <analyzer> <tokenizer class="solr.StandardTokenizerFactory"/> <filter class="solr.TurkishLowerCaseFilterFactory"/> <filter class="solr.StopFilterFactory" words="lang/stopwords_tr.txt" ignoreCase="false"/> <filter class="solr.SnowballPorterFilterFactory" language="Turkish"/> </analyzer> </fieldType> 复制代码
+ (3) field:字段,用来创建索引,如果这个字段需要生成索引,则需要设置的indexed为true,需要存储设置stored属性为true。例如:
<field name="age" type="pint" indexed="true" stored="true"/> 复制代码
### 3.2 添加索引字段
+ 方式一:直接修改managed-schema配置文件(不推荐,修改后需要重启服务),例如:
<font style="color:rgb(51, 51, 51);background-color:rgb(248, 248, 248);"><field </font><font style="color:rgb(51, 51, 51);">name</font><font style="color:rgb(51, 51, 51);background-color:rgb(248, 248, 248);">=</font><font style="color:rgb(221, 17, 68);">"age"</font><font style="color:rgb(51, 51, 51);background-color:rgb(248, 248, 248);"> type=</font><font style="color:rgb(221, 17, 68);">"pint"</font><font style="color:rgb(51, 51, 51);background-color:rgb(248, 248, 248);"> indexed=</font><font style="color:rgb(221, 17, 68);">"true"</font><font style="color:rgb(51, 51, 51);background-color:rgb(248, 248, 248);"> stored=</font><font style="color:rgb(221, 17, 68);">"true"</font><font style="color:rgb(51, 51, 51);background-color:rgb(248, 248, 248);">/></font>
+ 方式二:通过solr页面进行添加。(推荐,不需要重启服务)
<font style="color:rgb(51, 51, 51);"></font>
### 3.3 配置中文分词工具
+ 1.下载中文分词器IKAnalyzer,[下载地址](https://link.juejin.cn?target=https%3A%2F%2Fpan.baidu.com%2Fs%2F19_nVrOrUrj00rlu13OGOkg),密码:igt9。
+ 2.解压压缩包包,目录如下:

+ 3.将两个jar包复制到该路径下:E:\solr-8.1.1\server\solr-webapp\webapp\WEB-INF\lib。
+ 4.另外将三个配置文件复制到该路径下:E:\solr-8.1.1\server\solr-webapp\webapp\WEB-INF\classes。如果没有classes文件夹就新建一个。
+ 5.在schema中添加分词器。
```shell
<fieldType name="text_ik" class="solr.TextField">
<analyzer type="index">
<tokenizer class="org.wltea.analyzer.lucene.IKTokenizerFactory" useSmart="false" conf="ik.conf"/>
<filter class="solr.LowerCaseFilterFactory"/>
</analyzer>
<analyzer type="query">
<tokenizer class="org.wltea.analyzer.lucene.IKTokenizerFactory" useSmart="true" conf="ik.conf"/>
<filter class="solr.LowerCaseFilterFactory"/>
</analyzer>
</fieldType>
```
+ 6.在ext.dic文件中添加自定义的中文词组
+ 需要重启solr
效果如下:
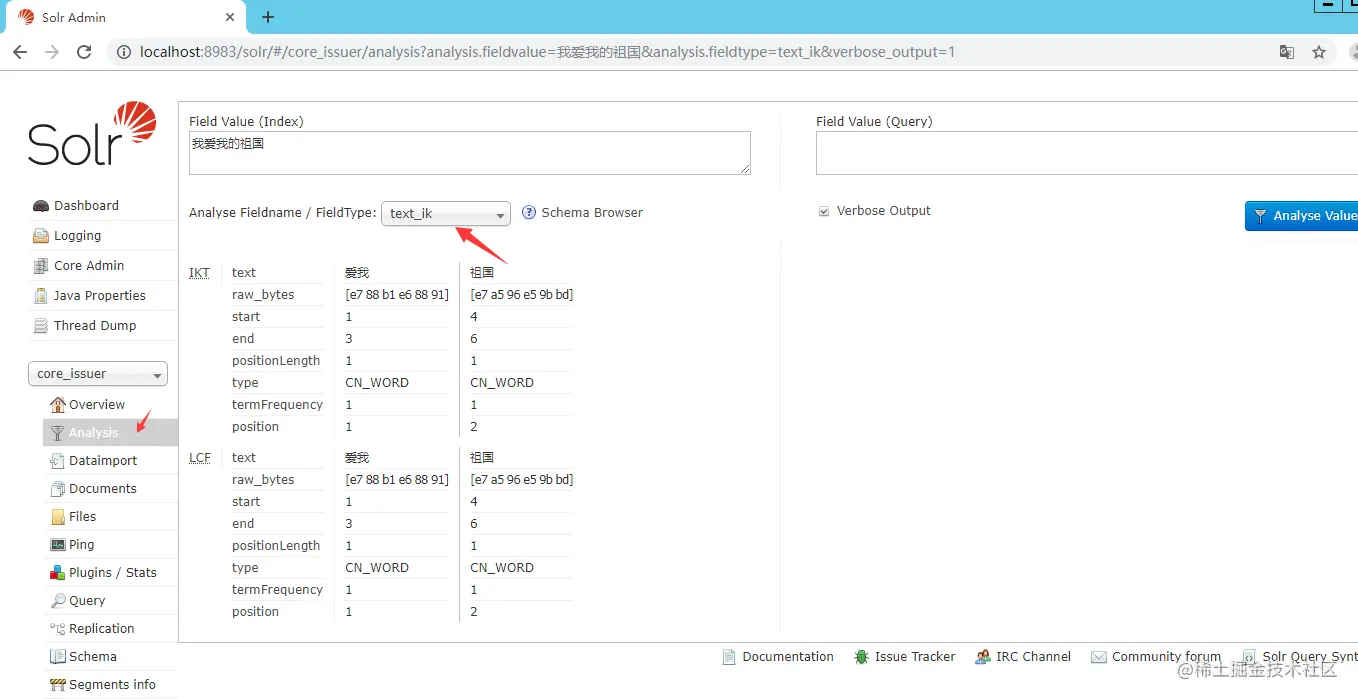
## 四、导入索引数据(mysql数据为例)
+ 1.创建mysql数据库
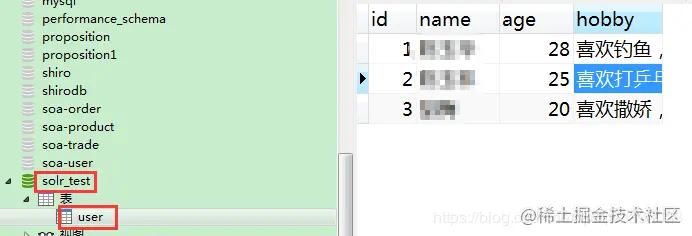
+ 2.在该路径下solr_home\server\solr\new_core\conf(E:\solr-8.1.1\server\solr\core_issuer\conf)下新建my-data-config.xml文件
```shell
<?xml version="1.0" encoding="UTF-8" ?>
<dataConfig>
<dataSource type="JdbcDataSource" driver="com.mysql.jdbc.Driver" url="jdbc:mysql://localhost:3306/solr_test"
user="root" password=""/>
<document>
<entity name="user" query="select * from user">
<field column="id" name="id"/>
<field column="age" name="age"/>
<field column="name" name="name"/>
<field column="hobby" name="hobby"/>
</entity>
</document>
</dataConfig>
```
+ 3.用solr添加数据库字段对应的索引字段,添加后打开managed-schema文件会看到:
```shell
<field name="name" type="string" indexed="true" stored="true"/>
<field name="age" type="pint" indexed="true" stored="true"/>
<field name="hobby" type="string" indexed="true" stored="true"/>
```
**请勿添加id字段,该字段已存在,添加会报错**
+ 4.打开该路径下文件:solr_home\server\solr\new_core\conf\solrconfig.xml(E:\solr-8.1.1\server\solr\core_issuer\conf\solrconfig.xml),随便找一个与requestHandler同级节点上添加以下配置。如图:

```shell
<requestHandler name="/dataimport" class="org.apache.solr.handler.dataimport.DataImportHandler">
<lst name="defaults">
<str name="config">my-data-config.xml</str>
</lst>
</requestHandler>
```
+ 5.将solr_home\dist(E:\solr-8.1.1\dist)目录下的solr-dataimporthandler-8.1.1.jar和MySQL驱动(随便找个MySQL驱动)复制到solr_home\server\solr-webapp\webapp\WEB-INF\lib(E:\solr-8.1.1\server\solr-webapp\webapp\WEB-INF\lib)目录下。
+ 6.重启solr服务。
+ 7.打开solr页面,进行下面操作。
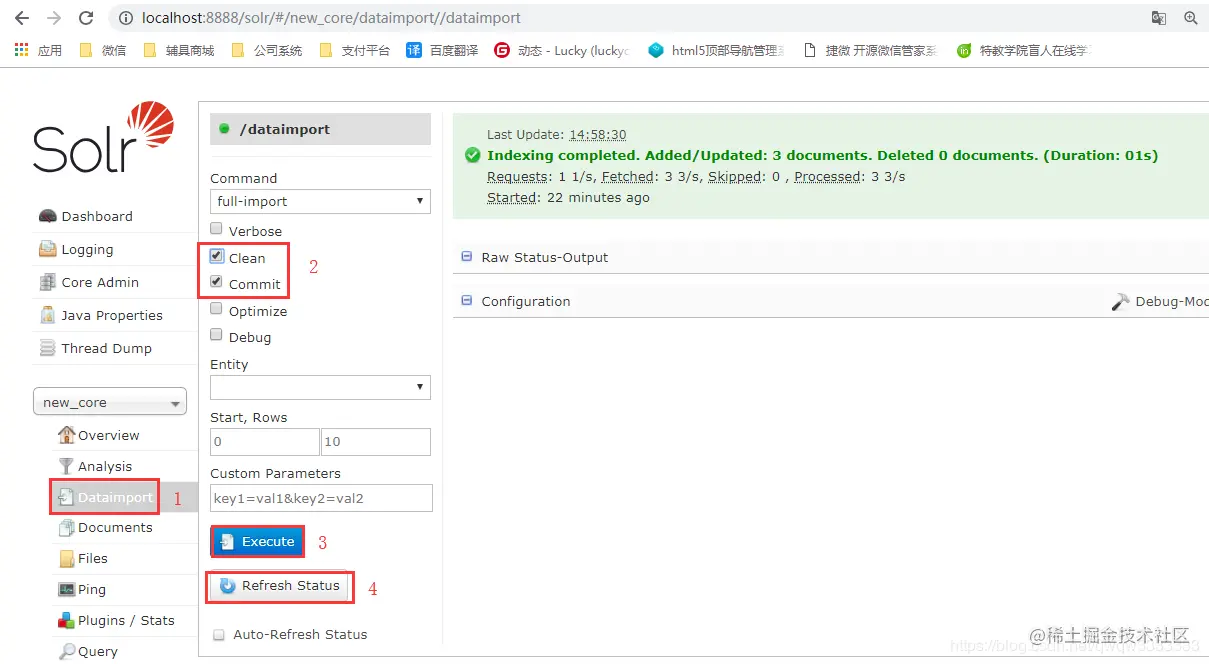
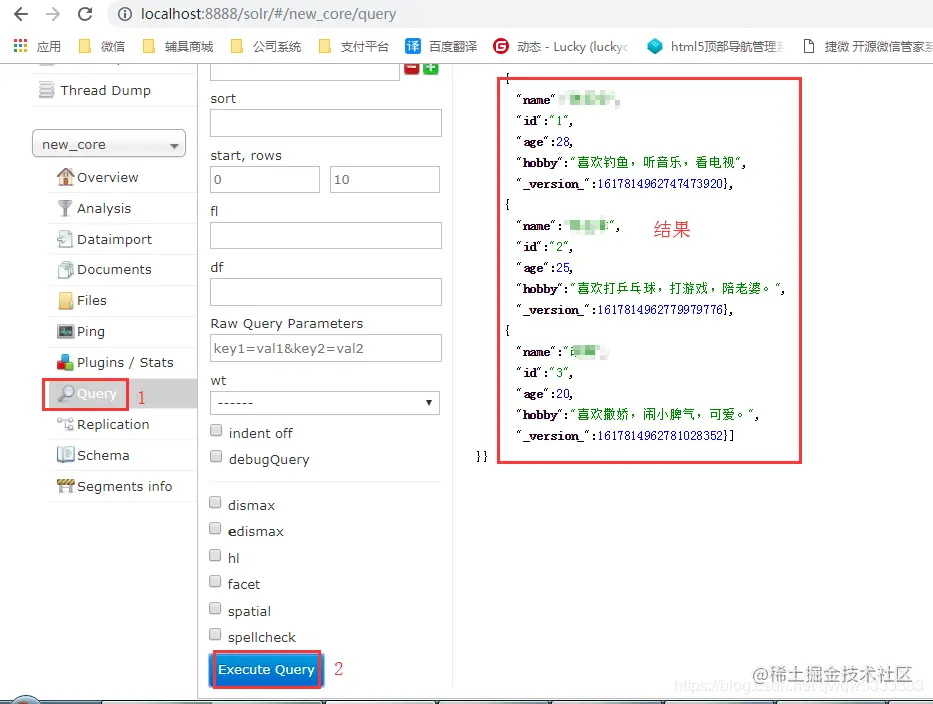
+ 8.检测数据是否导入成功
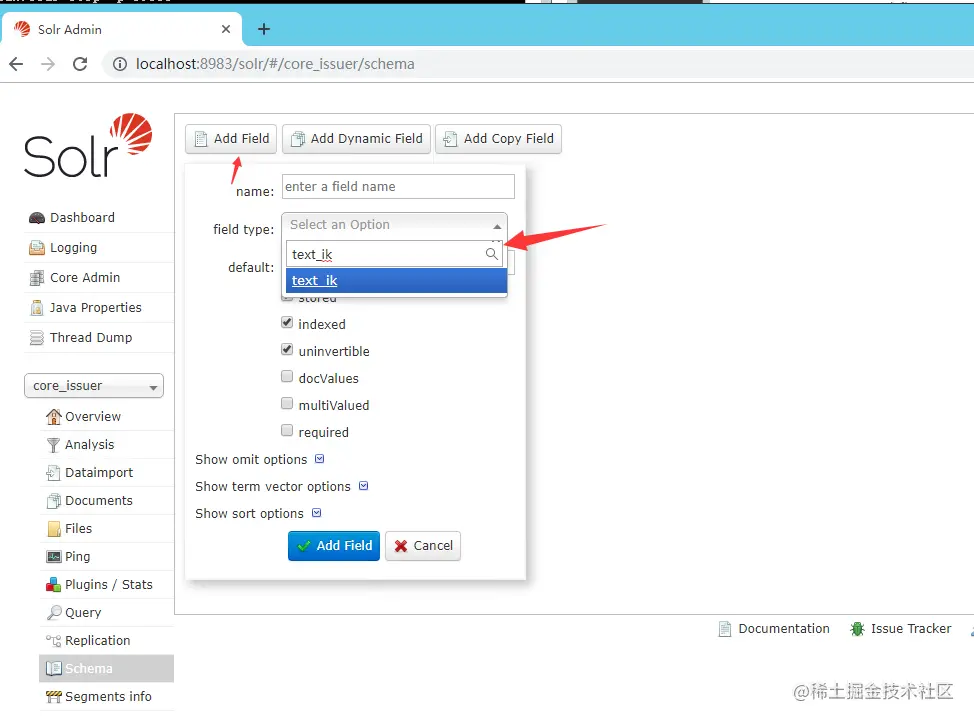
### 如果对索引字段进行中文分词
添加对索引字段时,fileType :选择text_ik
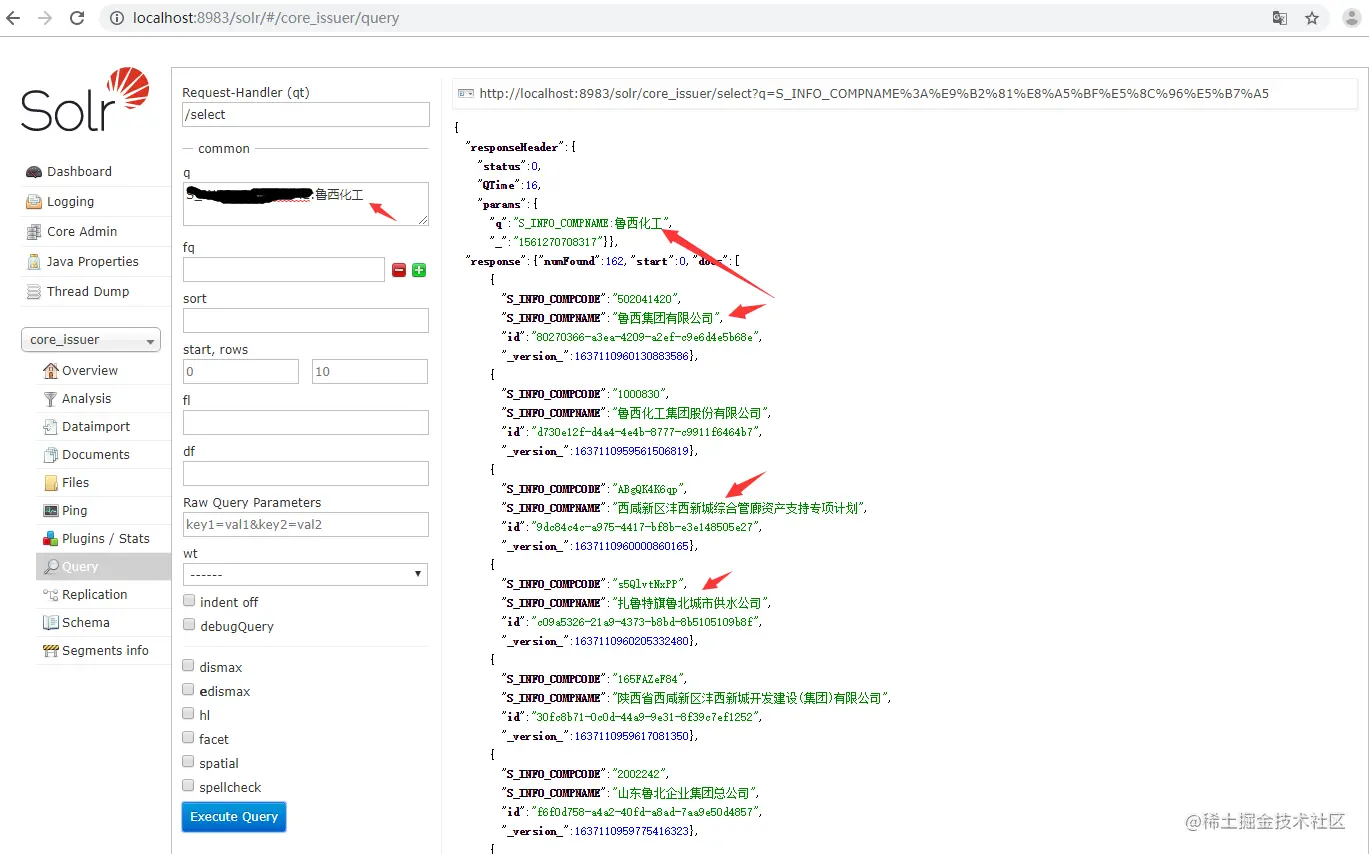
效果如图: 查询 **鲁西化工** 的结果
##
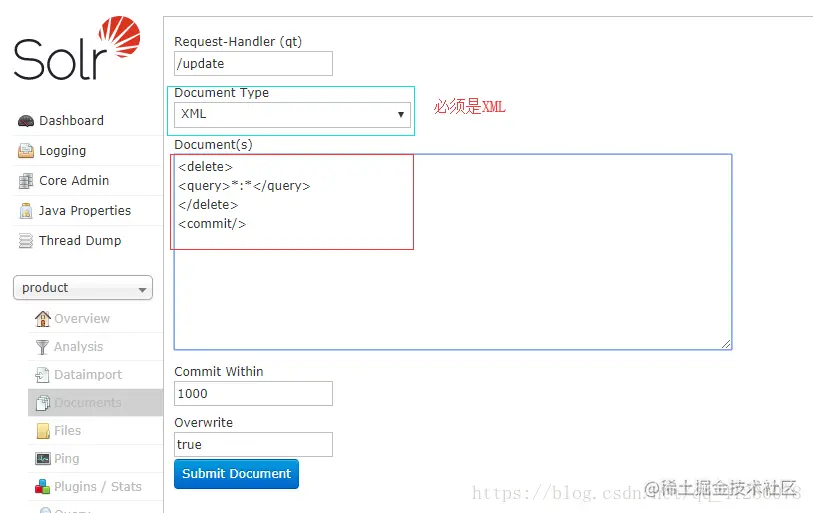
## 七、删除索引库(删除所有数据)的两种方法
+ 1.删除索引库所有数据的方法一:直接用solr可视化界面删除
|


